
Projects
- Henry's Bucket
Whenever a special, gift-giving occasion comes around (Christmas, Birthdays, etc) I always try to include at least one handmade element, just to add to the meaningful-ness of the gift, you know? Normally this takes the form of handmade cards with designs on the front, often done in watercolour or fineliner pen. This time however, with Mothers Day just around the corner, my partner gave me the idea of making a little embroidered patch that can be sewn on to a jacket or tote bag.
"PERFECT!" I thought, "I can make a cute little design and they can decide what to use it on. It doesn't even have to be very complicated, and if I'm quick, I can mail it for them to open on the day!"
I remember that day fondly. The naivety, the gumption, the NOTIONS! It was a simpler time... I shall miss it very much.
I gave myself a week to finish this project and mail it away. The fact that I had never done any embroidery EVER simply was not an issue. How hard can it be? How long can it possibly take?
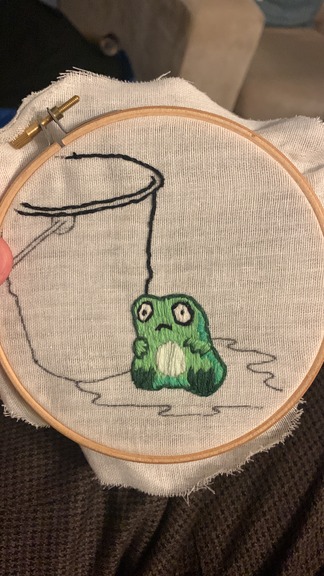
I started by sketching out my design on paper. Since the recipient in quesiton was a particularly keen gardener, I decided something fairly outdoors-ey or animal related would go down quite well. They quite often send me pictures of the animals they find in their garden, but the usual suspects of common birds and the odd rabbit seemed a tad boring, and since they just built their own pond, I decided a little frog would be the ideal candidate. A little frog sat next to their favourite bucket, which has just sprung a leak.
The design itself was a fairly simple sketch, and once I darkened it in pen, I was ready to transfer it on to my material. I chose a 5 inch diameter embroidery loop and cut two layers of muslin and layered them on top of eachother before securing them in the loop. It wasn't untill the cloth was secure and I began tracing the design out that I realised I really hand't given myself enough room, but going back to the shop and spending more money on another craft material I might never use again just didn't seem worth it. I'll just have to try and fix it later.
Ok, now it's on to the process. Once the sketch was on I started laying down colours on the frog. I used the biggest embroidery needle I could get away with and split each strand of embroidery thread I used into two. Each skein was comprised of 6 threads, so I was essentially sewing with 3 threads on the needle at a time. Once split, you can run them through some sewing wax to help prevent the strands from tangling around eachother and clogging up your work. I often didn't bother with this step, but in retrospect it would have saved me SO MUCH TIME oh my god... lesson learned.
Once the thread is prepared, you really need to decide on how you're going to lay the thread down, because HOW you sew has a huge effect on the final product. I don't know if it comes across in the pictures, but for the main body I'm using fairly uniform legnth strands going up and down, which gives the frog quite a soft, almost cuddly/plush quality which I like a lot. What was important though, is changing directions for the hands. This helps distinguish them as a seperate part of the same thing, without having to do a complete outline. Similarly the shadows needed to be going a different direction to make it clear that it wasn't just a differently coloured part of the frog. I don't know how well I did this, and I know I sound like I have a wealth of experience here, but I'm quite happy with the results, so I can only concluded I did an OK job.
Keeping the thread decently long also really helped with the water on the ground. And changing legnth and direction really helps make those white highlights pop. If I was going to do this again, I think I would have taken more time to sketch out the highlights before starting them. I did them freehand as a late addition and whilst I think they turned out alright, I do think they could have been a little better, especially that big one on the right.
My biggest challenge with this piece was actually the bucket. Keeping the thread legnth quite short gives it a very different texture to the frog and the water, which is great, but making such small stitches, and having them always follow the curvature of the bucket took FOREVER. It was by far the longest part of the process, but I knew it was only the first layer of what needed to be done. I tried experimenting with shading techniques on the left, like some kind of hatching effect, but I dont think it turned out quite right. The shading inside the bucket is also entirely the wrong shape, and whilst the colour is right, I know it could be better. The crack in the bottom and the surrounding rust were added in freehand at the end too. They turned out alright, you get the idea of what's happened, and that's all I needed it to do.
By this point, it was really getting down to the wire. The night before we set off I cut the piece out, leaving about an inch all around, and made straight cuts towards the piece so I could fold the excess over and glue them down to the back. Then it was just a case of attaching some iron-on interfacing and stitching around the entire edge to seal it all in. unfortunately I dont have pictures of this stage, but what I do remember is that I had to finish this stage off away from home, so I didn't have all the colours I needed to make an outline that followed the colours of the frog, bucket, and water, meaning I had to add a black outline around the whole piece. Whilst this will make it easier to sew on to something, I do think it looks a bit uglier.
Remember when I said I gave myself a week to get this done. I'd like you to think back to that time and judge me by the frog I once was, not the hollowed out husk that speaks to you now.
THIS TOOK ME A MONTH AND A HALF

Embroidery is not a particularly difficult hobby. You can get into the flow state very quickly, and is full of hundreds of satisfying little micro decisions that you make every minute about how you want each thread to be placed, and after having delved into it a bit deeper since then, there's only a few more difficult techniques before you start adding in beads and stuff. But what it is, is time consuming. Even little details can take a long time, and its not exactly the most portable hobby in the world, especially if you're taking it on public transport or whatever. The ideal environment for embroidery, at least for me, is sat on the couch infront of a movie, which only leaves so many hours in a day. So if you're going to embroider something as a gift, multiply the time you're giving yourself by 4, and you'll be fine.
- Pros of Embroidery
- Pretty inexpensive to get into
- Very gentle learning curve
- You can zone out in front of the TV and still do it
- SATISFYING AS F*CK
- You get something cool at the end of it
- Cons of Embroidery
- Can take forever
- Stabbing yourself in the fingers really hurts
- De-tangling thread is really annoying
To sum up, I had an absolute blast making this. I learned a bunch and really want to continue making cool stuff for myself and friends. I already have a bunch of designs I want to try. Maybe someday I'll even get the time to do them.
P.S. My Mum loved the patch, and later that day I caught her sewing it on to the apron she uses in the garden. "Henry's going to keep me company in the garden," she said. "That's a great name," I thought to myself. I'll need to remember that.